YouTube is quickly becoming the go-to platform for podcasters, and it’s easy to see why. They’re offering cool incentives for creators who want to start a podcast on YouTube or add their existing episodes to the platform.
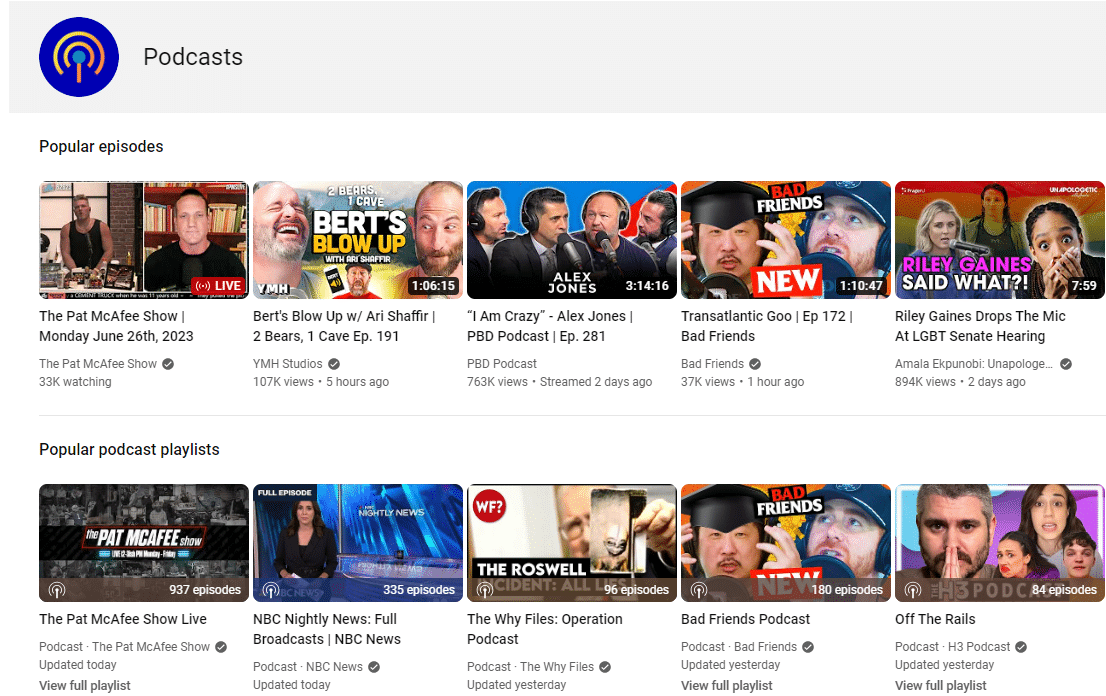
With over 2.3 billion active monthly users, Podcasts on YouTube gives you an incredible way to promote your podcast and connect with new fans. Plus, they’ve been rolling out new tools and features specifically for podcasters, like better discoverability and even monetization options.
If you’re not already using YouTube for your podcast, now’s the time to get started – it’s where a lot of listeners are heading in 2025!
In this post you’ll learn:
- Why you should publish your podcast on YouTube
- How to create a podcast on YouTube
- How to convert your audio-focused podcast episodes into engaging videos
- How to record a video podcast using Riverside.fm or Zoom
🎙️ Ready to start podcasting on YouTube? Let’s go!
How to Start a New Podcast on YouTube
YouTube now provides a way for podcasters like yourself to create a podcast directly on YouTube.
YouTube Podcasters receive special perks by organizing the episodes they’ve uploaded to YouTube into playlists and designating those playlists as a podcast.
These perks include:
- Having your podcast on YouTube Music
- Podcast-specific recommendations that will make it easier for your show to be discovered by people with similar interests
- Official podcast cards that feature specific shows and their most recent episodes
- The possibility of having your show featured on YouTube Podcasts
- YouTube podcast badges you can use for marketing and promotions
- Easy discovery from the Watch page to help listeners find your episodes
✅ If you are already filming your show or using an online recording studio like Riverside.fm you can simply upload your video files to YouTube.
✅ If your show is audio-focused, you can easily convert your audio files into engaging videos (more on that below).
✨ Don’t have a YouTube channel? No worries, setting one up is easy! Click here to learn how.
Log into YouTube
You’ll first need to log into your YouTube channel.
Once you are logged in, you’ll click the “Create” button in the top right then “New podcast.”
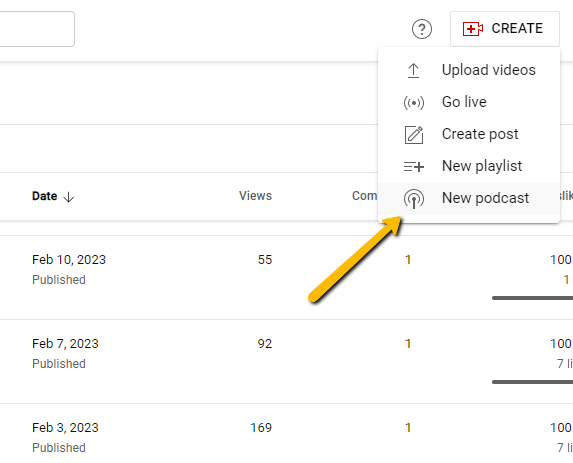
By selecting “New podcast” YouTube will automatically set the episodes you upload as a podcast.
If you’ve already added episodes to your channel, you can either create a new playlist or assign your episodes to an existing playlist which you can then set as a podcast so that YouTube knows those files are podcast episodes.
To update an existing YouTube playlist, just go to “Content” in your Dashboard, then “Playlists.”
Select the playlist you were using for your show and select “Set as podcast” as highlighted in the image below.
💡You can set multiple playlists as a podcast in YouTube.
For example, if you have multiple seasons of your show that are in different playlists you can set each one as a podcast.

If you are looking for more information on how to create a podcast in YouTube, you can check out the video below from YouTube Creators.

How to Convert Your Audio Podcast Episodes into Videos
The easiest way to start an audio-focused podcast on YouTube is to simply convert your podcast’s episode audio into video files and then upload them to YouTube.
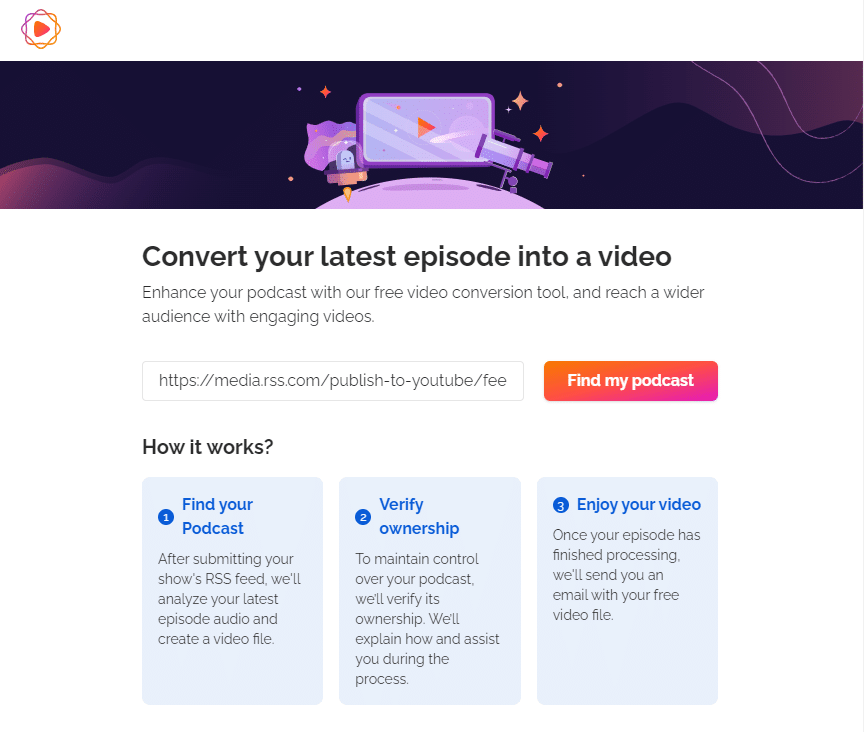
You can use a free tool like PodViz that automatically converts your audio episodes into engaging videos.
✨ Converting your episodes with PodViz is a breeze, just go to RSS.com/podviz and copy and paste your show’s RSS feed.
Check out this video for a walkthrough of how to get your podcast on YouTube with Podviz:

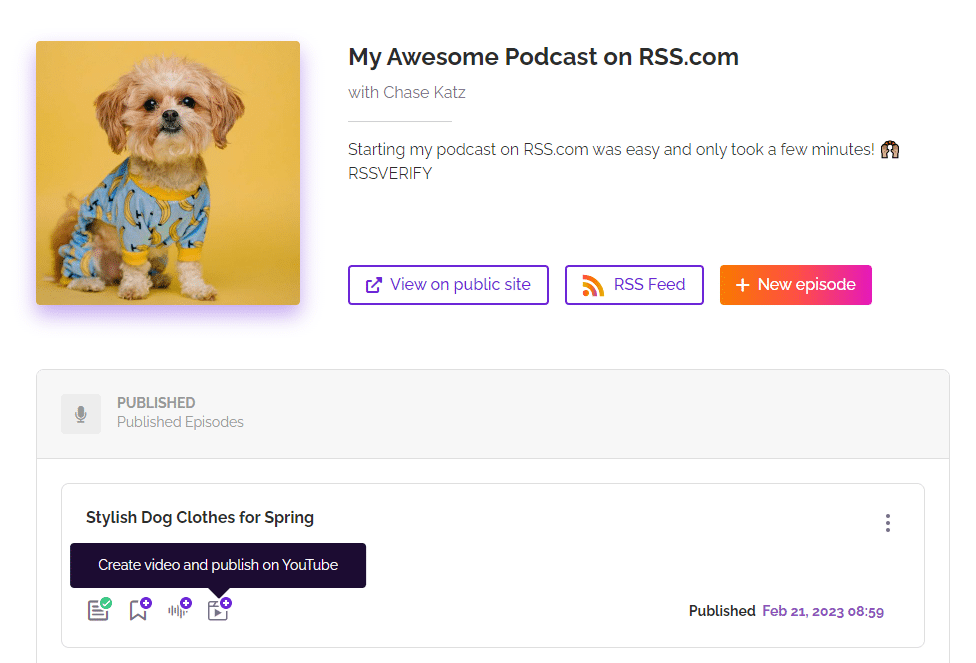
If your podcast is hosted by RSS.com, you can convert all your audio episodes into video files directly in your Dashboard with just 1-click.
RSS.com will also sync with your YouTube channel and automatically upload your new videos directly to your YouTube channel – awesome right?
✨ If you don’t have an account on RSS.com, you can create one for free here.
💡 Pro Tip: Transcribe your podcast’s audio for free – learn how here.

Filming Your Podcast 🎬
Filming your podcast is a great option as viewers now get to be a part of the live experience.
This format is engaging and allows you to create a connection with your listeners that can be hard with just audio alone.
📸 Josh Elledge of UpMyInfluence, suggests using a high quality DSLR camera to film your podcast. He says that while you can get away with a streaming webcam, you won’t get nearly the quality that a more professional camera will give you. Josh uses a Canon 80D and a Sigma 35mm 1.4 DG HSM ART Lens.
For more recommendations on the equipment you’ll need to film your podcast, you can check out his post on Video Marketing for Business/Entrepreneurs here.
How to Make Your Podcast YouTube Ready
1. Be mindful of your background
This means cleaning up the clutter in your room or creating a backdrop that hides the clutter.
Some video podcasters opt to just sit in front of a blank wall while filming. Others purchase a backdrop, or create an aesthetically pleasing/brand appropriate background behind them.

In the above video podcast, YouTubers Erik Stocklin and Colleen Ballinger have created a backdrop that features images and art that is on-brand for their Miranda Sings YouTube channel.
They are using background lighting that is not too harsh, with the foreground lighting focused directly on them.
2. Be mindful of the lighting
The lighting can be as simple as a ring light, or as complex as a full studio lighting kit.
Why does lighting matter? It ensures viewers can see you and helps with creating the mood and feel of your video.
Here are a few lighting options recommended in the lighting tutorial playlist created by the YouTube and podcasting pros at Think Media:
- Selfie Ring Light with Tripod Stand
- GVM RGB LED Video Lighting Kit
- MOUNTDOG Softbox Lighting Kit Photography Studio Light
💡 Pro Tip: The YouTube Creator Academy is 100% free, and filled with great ideas on framing your shots, using lighting effectively, and recording sound like a pro.
3. Use a high-quality microphone
Not all mics are created equal. Here’s a list of microphones we recommend for podcasting:
- Samsung Q2U
- Blue Yeti USB Microphone
- Audio-Technica ATR2100x-USB Cardioid Dynamic Microphone
- Audio-Technica AT2020 Cardioid Condenser Studio XLR Microphone
- Shure SM7B Cardioid Dynamic Microphone
- Rode Procaster Broadcast Dynamic Vocal Microphone
- HEiL sound PR-40 Dynamic Studio Microphone
We’ve created a guide to help you find the best sounding mic for your budget.
You should also seriously consider investing in a sound mixer like the Samson Mixpad MXP124FX Compact, 12-Channel Analog Stereo Mixer with Effects and USB. You may also want to invest in sound absorption panels to “treat the room” and remove background noise and echoes.
Also, because we are talking about sound quality, be cognizant of background noises like an air conditioner, barking dogs, your neighbor mowing the lawn etc.
4. Consider the other places you will share your video before you hit record
If you plan on starting a podcast on YouTube, you’ll want to consider everywhere the video will be shared. For example, will you be using it solely on YouTube in a horizontal format? Or will you be sharing it on TikTok and Instagram as well?
If you plan on using social media, it’s a good idea to have your cell phone set up for vertical filming at the same time that you will be recording your episodes. This way while your lighting is already set up you can film teaser videos that will pique your audience’s interest and entice them to head to the links for the full episodes.
Of course, to have your guest in any of these vertical videos may require some skill in video editing on your part, but by thinking about where your content will be used you can plan ahead and save yourself time later. After all, filming content for other mediums will be much easier while the guest and/or your subject materials are all fresh in your mind.
How to Record Your Podcast using Riverside.fm
Similar to Zoom, you can record the audio and video of your podcast using Riverside.fm.
You can get started for free with Riverside.fm – however, if you’d like to access additional features, you’ll need to sign up for a paid plan.
💡 Pro Tip: You and/or your guests need to use the Riverside.fm mobile app, or either a Microsoft Edge Browser or Google Chrome browser in order to record videos with the platform.
Here’s how to get started:
- On the homepage, click “Get Started” and sign up for an account. You can sign up with your Google Account, Apple Account, or with an email and password
- Once your account is created, you will have an automatically generated “studio” for your podcast.
- To start recording immediately, click your studio name, and then “Go to Studio.”
- You’ll add your name as the host, and then update your settings to indicate what microphone, webcam, and how you are listening. Then, click “Join Studio”
- Finally, click the recording button and you can instantly record your video podcast.
If you want to add a guest(s), before clicking “Go to Studio,” click “Invite.”
You’ll be given a link that you can send to your guest(s).
When it’s time to record, you’ll follow the same steps you did when recording yourself solo.

🎬 How to Record Your Podcast Using Zoom
Having a guest or multiple guests on your podcast is always exciting.
But, what if they live far from you or aren’t able to make it to your studio?
Zoom can be used to create excellent video podcasts.
The process is pretty straight-forward – here’s how to set it up:
- Create an account on Zoom
- Next Click the Zoom icon on your desktop to open the software
- Click the gear icon on the top right corner to navigate to the settings menu
- Select the “Video” tab
- Adjust settings + preferences to touch up your appearance, adjust for low lighting, add a virtual background, etc.
- Select the “Audio” tab
- Change your speaker and microphone preferences to your podcasting tools or headphones
- Close the settings menu.
- Click the orange “New Meeting” button
- Invite the podcast guest(s) via a Zoom link or code
- Start your episode
- When your episode is wrapped up, click “End Meeting”
- Allow a few minutes for Zoom to convert the video and audio files then download
- Edit your video and upload to YouTube
💡 Pro Tip #1: Make sure to connect your device to the internet via an ethernet cable for consistent quality. This ensures a faster and more reliable internet connection throughout your podcast and crisper audio and video quality.
Zoom allows you to record and download separate audio files for each speaker which can make editing audio easier.
Go to your Zoom settings (the gear icon) and click on the “Recording” tab. Then, select the option called “Record a separate audio file for each participant who speaks.”
Check out the video below for step-by-step instructions on how to record a podcast episode using Zoom.